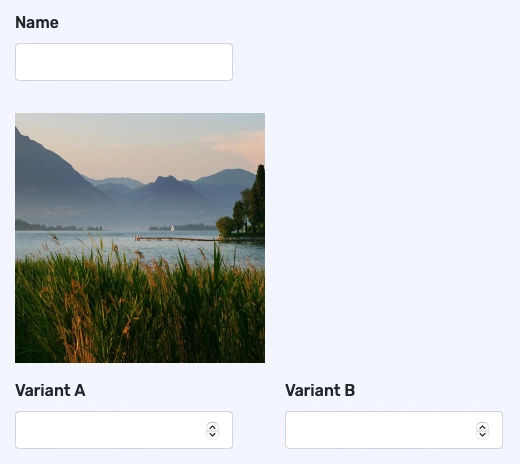
Form Definition
As you may have noticed, the Forminer form definition consists of three parts: layouts, schema, and views. On the contrary, a uniforms schema is only a single object, called bridge. It may be surprising because Forminer is based on uniforms. Let's look into them one by one:
Schema. This part contains the data definition, which is a list of fields. Each field has a name, data type, default value, error messages, and validation rules (e.g., minimum string length, numeric range). It's a custom format, heavily inspired by the JSON Schema.
- To make it understandable for uniforms, it's being transformed into one, actually. Additionally, it's possible to subset it, creating a JSON Schema of a single page. Of course, all of this logic is aware of a Forminer-only feature: conditional rendering.
Views. This part defines the way a field is displayed. Most importantly, it defines which of the registered uniforms-compatible components will be used. Besides that, there are also field properties, like the label or placeholder. Lastly, there's the conditional rendering rule (if any).
Layouts. This part is a list of form pages. Every page has a name and one layout item. A layout item is one of the following:
A field, rendering a given view, as defined in views.
A widget, rendering a read-only component, e.g., some text or an image.
A container, rendering some wrapper (carousel, list, table, etc.) and its inner layout item(s). That's the power of Forminer – you can freely nest containers without extra logic. However, it makes the form definition recursive, making it not necessarily easy to store in a non-recursive fashion. We got you covered – there's a pair of helper functions that (de)linearize the form definition into a non-recursive structure.
Example form definition
{
  "schema": [
    // Every field has an unique `fieldId` provided by the Forminer.
    { "fieldId": "1", "name": "name", "type": "string", "required": true },
    { "fieldId": "2", "name": "variantA", "type": "number", "required": true },
    { "fieldId": "3", "name": "variantB", "type": "number", "required": true }
  ],
  "views": [
    // Every view has an unique `viewId` provided by the Forminer.
    {
      "component": "TextField",
      "fieldId": "1",
      "label": "Name",
      "viewId": "1"
    },
    {
      "component": "AutoField",
      "fieldId": "2",
      "label": "Variant A",
      "viewId": "2"
    },
    {
      "component": "NumField",
      "fieldId": "3",
      "label": "Variant B",
      "viewId": "3"
    }
  ],
  "layouts": [
    {
      "name": "Page 1",
      // A page is by default rendered using a vertical list.
      "layout": {
        "kind": "Container",
        "type": "List",
        "config": { "variant": "vertical" },
        // Every layout node has an unique `layoutId` provided by the Forminer.
        "layoutId": "1",
        "children": [
          { "kind": "Field", "viewId": "1", "layoutId": "2" },
          {
            "kind": "Widget",
            "type": "Image",
            "config": {
              "imageUrl": "https://picsum.photos/500",
              "alt": "Random image",
              "width": 250,
              "height": 250
            },
            "layoutId": "3"
          },
          {
            "kind": "Container",
            "config": { "variant": "horizontal" },
            "type": "List",
            "layoutId": "4",
            "children": [
              { "kind": "Field", "viewId": "2", "layoutId": "5" },
              { "kind": "Field", "viewId": "3", "layoutId": "6" }
            ]
          }
        ]
      }
    }
  ]
}

Advanced usage
Now, there's a twist! The Forminer UI allows you to build any form you'd like, but the form definition allows you to do two more things:
Every field can have multiple views. The field's value is shared between the views, but you can use different components for each of them. A good example is an address input and a map – instead of building it within one component, you could have two independent ones.
Every view can be used multiple times in the layouts. Similarly, you can render the same view multiple times. A good example is to give the user an option to review the values before sending them by displaying the same view the second time on the last page.
Neither of these features is available in the UI, but you can leverage them while manipulating the form definition programmatically. It can be used to automatically enrich the forms that the users built.
Here's an example schema leveraging these two features:
{
  "views": [
    // Note that these two views have the same `fieldId`.
    {
      "component": "AutoField",
      "fieldId": "1",
      "label": "First name (a)",
      "viewId": "1"
    },
    {
      "component": "AutoField",
      "fieldId": "1",
      "label": "First name (b)",
      "viewId": "2"
    },
    {
      "component": "AutoField",
      "fieldId": "2",
      "label": "Last name",
      "viewId": "3"
    }
  ],
  "layouts": [
    {
      "name": "Page 1",
      "layout": {
        "kind": "Container",
        "type": "List",
        "config": { "variant": "vertical" },
        "layoutId": "1",
        "children": [
          { "kind": "Field", "viewId": "1", "layoutId": "2" },
          { "kind": "Field", "viewId": "2", "layoutId": "3" },
          // Note that these two layout nodes have the same `viewId`.
          { "kind": "Field", "viewId": "3", "layoutId": "4" },
          { "kind": "Field", "viewId": "3", "layoutId": "5" }
        ]
      }
    }
  ],
  "schema": [
    { "fieldId": "1", "name": "firstName", "type": "string" },
    { "fieldId": "2", "name": "lastName", "type": "string" }
  ]
}
On the right, you can see the form rendered using the above schema.
As you can see, the layout node that refer to the same view (bottom two) are rendered identically and their values are synced.
The top two values have different views a(and different labels in this example), but as they refer to the same field, their value is also synced.